Wednesday, June 25, 2008

DPN or Crochet Hook Needle Case - Needle Felted

DPN or Crochet Hook Case
Needle Felting pattern by Nadine Borovicka
http://nadinescrafts.blogspot.com/
http://Nadinespatterns.blogspot.com/
An easy project using the sheets of felt you can purchase from just about any craft store and even Wal-mart. I get to cheat now using my needle felting machine, but the first few I did were done by hand.

Materials:
At least 2 sheets of 8 ½ X 11 inch felt – you can use more sheets or some roving to add decoration to the front
Felting needles – either singles, puncher or machine
Scissors
A base to needle felt on if doing it by hand – foam or one of the brush bases you can buy

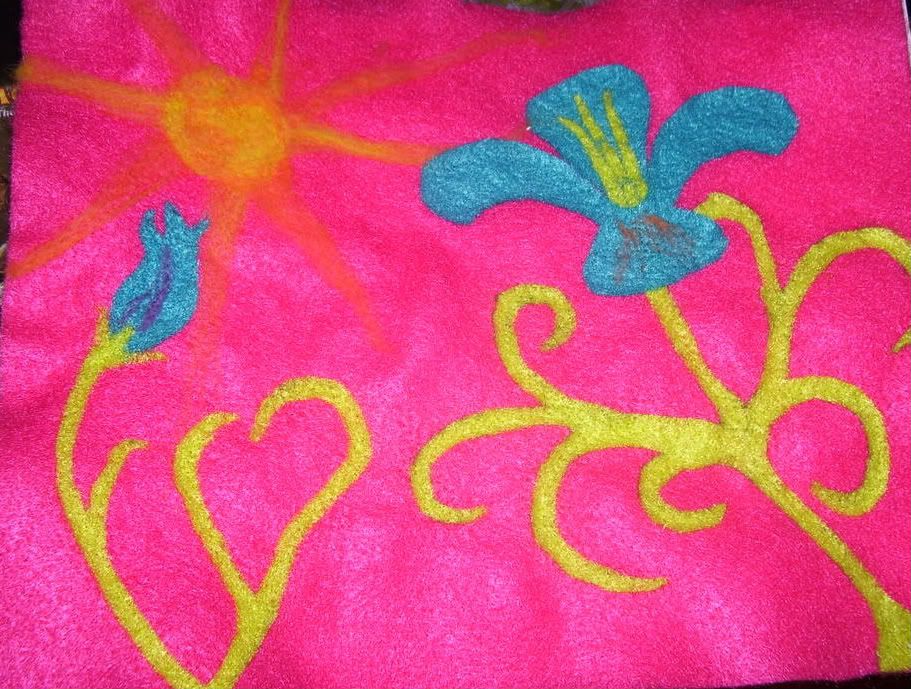
This step is optional. Take the sheet that will essentially be the cover. You can leave it plain or do as I have and add fun designs to it. Make cases that match your knitting or crocheting bags or get creative.


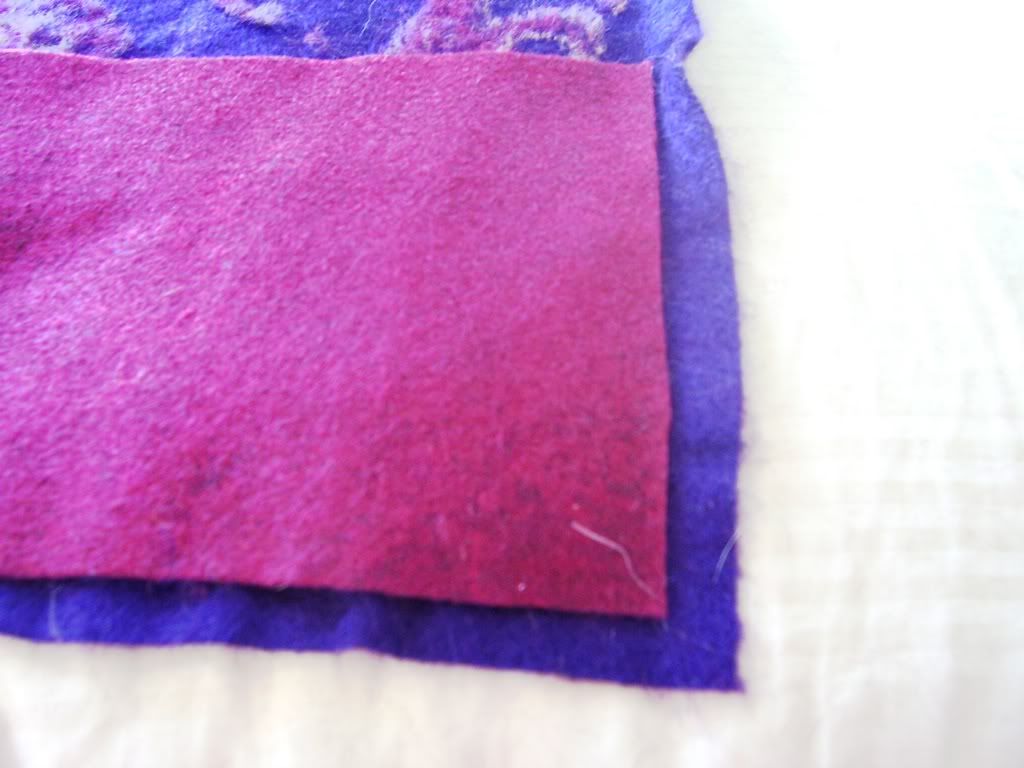
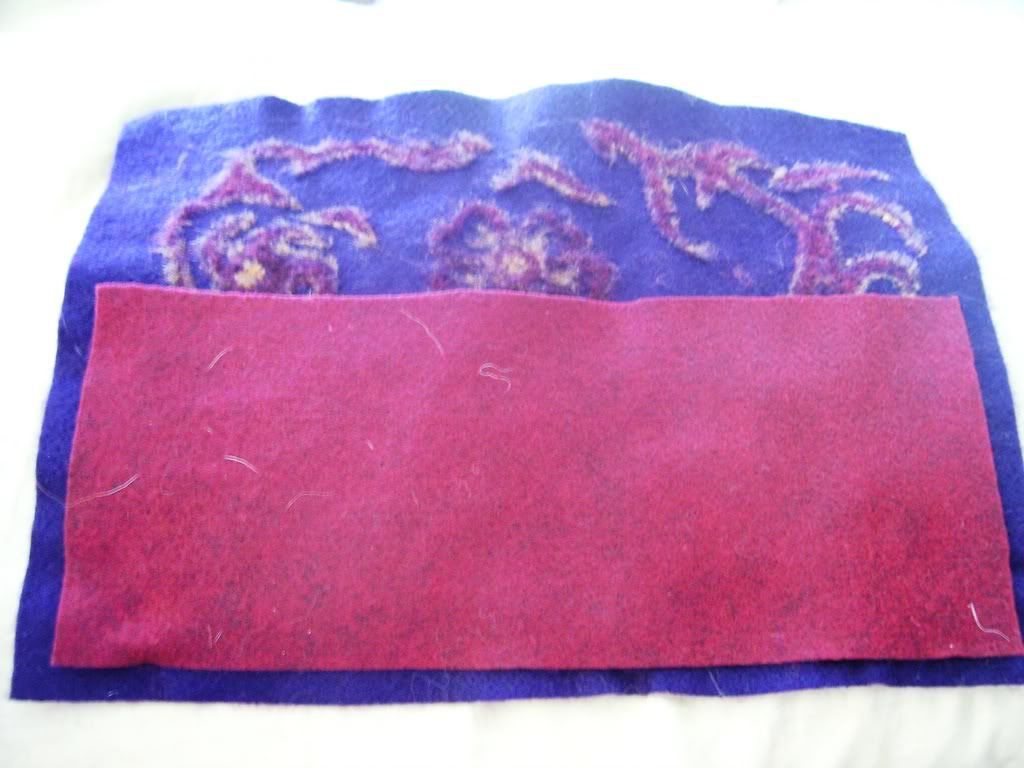
Take the second sheet of felt and cut it in half long ways. Then trim the side edges so that you have about ¼ of an inch of the cover sheet overhanging the pocket to make the seam. Place the pocket so that there is also a ¼ of an inch overhang at the bottom.


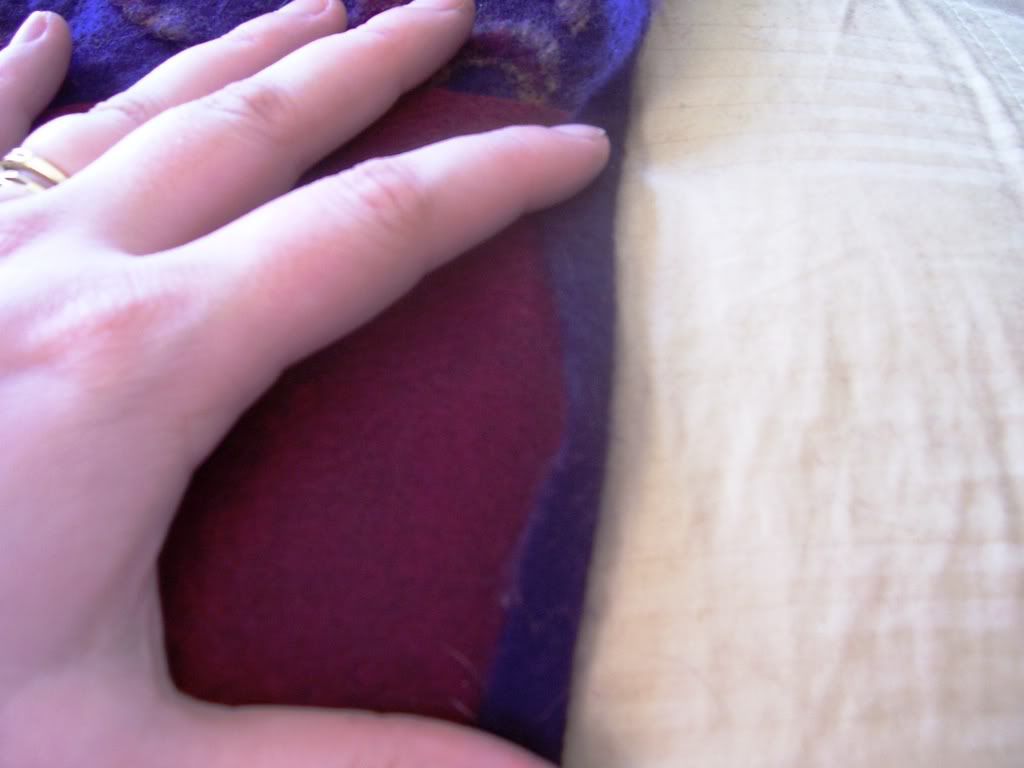
Fold over this edge. This is the tricky part. In order not to mess up the design on the cover, you will actually need to turn this over and work from the other side. So you will turn it with the decorated side up and the pocket underneath (the opposite of what I am doing in the picture). Fold over the seam and use your needle to felt the edges to create a strong seam. If you don’t feel comfortable with this, you can sew the edge. You will have a ¼ inch seam on the entirety of both side edges and the bottom. On the top, you can fold over ½ to 1 inch of the top and lightly felt to create a flap to keep the needles from escaping out the top. Just make sure you don’t fold down too much so that your needles don’t fit.

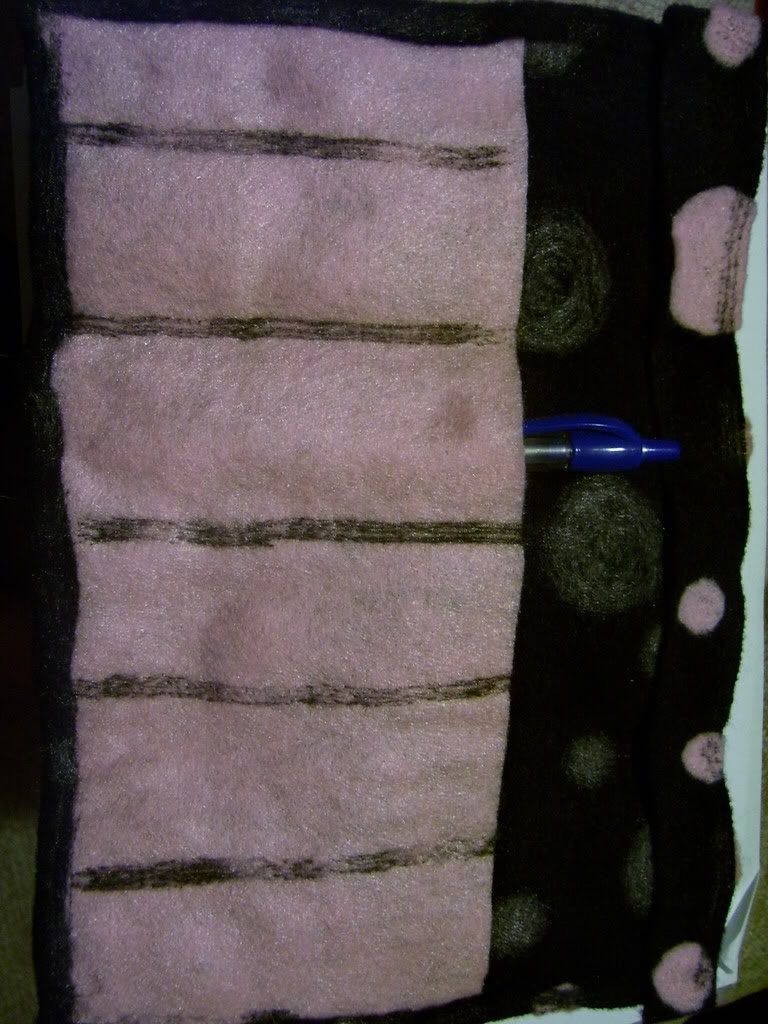
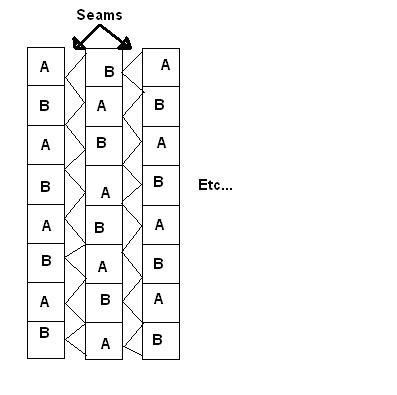
Again working with the cover side up you will make the pockets for the needles. Felt lines running up the pocket as in the picture above. If you work from the pocket side, you will push through fibers that will ruin the design on the front so you have to be sure that you are working so the fibers only show on the pocket side.

You can sew or felt on buttons or ties to close. I just roll mine up and tie it with a piece of yarn or ribbon.

Copyright © Nadine Borovicka 2008 All Rights Reserved. No part of this document may be reproduced or distributed without written consent from the author.

Checkerboard - Crochet

Checkerboard Set
Crochet pattern by Nadine Borovicka
http://nadinescrafts.blogspot.com/
http://Nadinespatterns.blogspot.com/
Perfect to rollup and stuff into a little crocheted bag for checkers on the go.

Download PDF Here

Materials:
Worsted Weight yarn (I used Red Heart in 3 colors I had laying around)
Size G Hook
Yarn Needle

Abbreviations:
Color A – player one color
Color B – player two color
Color C – the border color ( I used a variegated that combined colors A and B)
Ch – Chain
Sc – Single chain

Board (just using colors A and B):
With color A, chain 9, SC in 2nd chain from hook and across (8 stitches). (Ch 1, turn, sc across) 6 times.
*Change color. (ch 1, turn, sc across) 8 times. Repeat from * 6 times. End with 8 blocks of alternating colors. Four blocks of color A and four of color B, starting with A and ending with B. You can either carry the strands of color up along the side of the strip or you can cut and rejoin. Either way, seaming and adding the border should cover up the extra strands.

Make eight of these strips. Seam them together, laying them beside each other and alternating their directions.


Diagram on how to line up and seam together board strips.

After board is sewn together, attach border color to the beginning of an edge.
* Sc 64 stitches evenly across edge. Sc, Ch 2, Sc in corner. Repeat from * 3 more times. Join to 1st Sc with a slip stitch.
(Ch 1, *SC to corner space. Sc, ch 2, sc in corner ch 2 space. Repeat from * to complete round. Join to first Sc with a slip stitch) Repeat 2 more times to complete border. Fasten off.

Game Pieces:
With color A or B, magic ring cast on, 6 sc in circle. Working in the round, 2 sc in each sc around (12 stitches). Change to color C, 2 sc in each sc around (24 stitches). Slip stitch in next sc to join the round. Fasten off.
Make 16 pieces with color A and 16 with color B.

Play checkers

Copyright © Nadine Borovicka 2008 All Rights Reserved. No part of this document may be reproduced or distributed without written consent from the author.

Handspun Hat - Knit


Handspun Hat
Knit pattern by Nadine Borovicka
http://nadinescrafts.blogspot.com/
http://Nadinespatterns.blogspot.com/
I had no idea what to make with my first handspun yarn. It was a bulky raspberry and cream 2-ply yarn. I was using Corridale, which was easy to spin but a bit too scratchy to wear next to my skin. I had just enough yardage for a hat.
As a note, after rows 1 and 2, the row number I give is no longer accurate. The cast on, decreases and increases can be your choice. They don’t add a particular design element so just use your favorite.
Download PDF Here

Materials:
Size 11 Needles
Bulky Yarn- I used handspun
Pom-pom maker-optional

Hat is knit flat them seamed up the back.

Cast on 52 stitches loosely. Method of cast on doesn’t really matter as long as it is stretchy enough to be the opening edge of the hat.

Row 1. Knit row
Row 2. Purl row
Repeat rows 1 and 2, 4 more times.

3. Knit row, decreasing 4 times evenly across the row (knit 2 together works just fine)
4. Purl row
Repeat 3 and 4 once more.

5. Knit row decreasing 4 times evenly across
6. Purl row decreasing 4 times evenly across
Repeat 5 and 6, 3 more times

Knit 3 together 4 times.
Bind off and gather top row of stitches, leaving a yarn tail long enough to sew up the seam.

On your starting edge, pick up 50 stitches.
1. Knit row
2. *Knit 2, increase *repeat across
3. *Knit 2, increase *repeat across
4. Knit row
Repeat row 4, 5 more times
Bind off very loosely. Sew up seam of hat. Add pom-pom to top of hat if you like.


Copyright © Nadine Borovicka 2008 All Rights Reserved. No part of this document may be reproduced or distributed without written consent from the author.

Cunning Hat - Loom Knit

Cunning Hat
Loom Knit pattern by Nadine Borovicka
http://nadinescrafts.blogspot.com/
http://Nadinespatterns.blogspot.com/
Inspired by the Jayne Cobb hat on Firefly


Download PDF Here

Materials:
Yellow Knifty Knitter
Orange Yarn (Lionbrand Jiffy in Rust)
Yellow Yarn (Lionbrand Jiffy in Gold)
Red Yarn (Lionbrand Wool-ease chunky in Redwood)
Loom Knitting Tool
Pom-pom maker
Yarn Needles

Abbreviations:
Color A = Orange
Color B = Yellow
Color C = Red
K = Knit stitch
P = Purl Stitch

E-wrap Cast on all pegs with color A. [K1, P1] around loom for five(5) rows. E-wrap stitch on one more row of color A. Do NOT knit off and do not cut color A yarn.

Start ear flaps working with color C. Starting on peg 8, working clockwise, e-wrap cast on 9 pegs. Knit 5 rows of color C back and forth on those 9 pegs. Do NOT touch strands of color A. We will come back to it. Increase the 6th row at both ends (11 pegs) and knit 7 rows. Increase the 13th row at both ends (13 pegs) and knit 7 rows. Increase the 21st row at both ends (15 pegs) and knit 10 rows. You’ll end the earflap with 3 loops on each of those 15 pegs. Two of color A on the bottom and one of color C on top. Cut Color C and make second ear flap starting on peg 33.


Diagram of peg placement

After both earflaps are finished, beginning with peg 1, knit non-ear flap pegs off 1 over 1 (just loops of color A). Knit off earflap pegs 1 over 2 (Pull the bottom loop of color A over both the top color A and color C loops). E-wrap around loom with color A. Non-ear flap pegs, knit off 1 over 1 (just loops of color A). Earflap pegs, knit off 2 over 1 (bottom 2 loops, 1 color A and 1 color C, over top loop of color A).
E-wrap knit normally with color A for 8 rows. Switch to color B, E-wrap knit for 15 rows. Bind off using Provisional method. Make a pom-pom with all three yarn colors and attach to the top of the hat. Tie off all of your ends but do NOT weave in to maintain that “just made by Ma Cobb” look.


Copyright © Nadine Borovicka 2008 All Rights Reserved. No part of this document may be reproduced or distributed without written consent from the author.

Skully Fingerless Mitts - Knit


Skully Fingerless Mitts
Knit pattern by Nadine Borovicka
http://nadinescrafts.blogspot.com/
http://Nadinespatterns.blogspot.com/
I needed a project for a teenager’s graduation party. I crossed my fingers and hoped that skulls were still in fashion and tried my first attempt at duplicate stitch.

Materials:
Size 4 DPNs
Caron Simply Soft or similar yarn of your choice in two colors

Abbreviations:
DPN- Double pointed needles
MC – Main color
AC- Accent/ Duplicate stitch color
K – Knit
P – Purl
M1 – Make 1 (increase method)

Cast on 40 stitches. Place marker for the beginning of round (slip this marker every time you come to it).
Join in the round and work around in K2, P2 ribbing for 4 inches (or longer if you like)
Knit around for 3 rows.
Beginning Thumb:
M1, K2, M1, place second marker, K around (42 stitches)
Knit around
Knit around
M1, K4, M1, slip second marker, K around (44)
Knit around
Knit around
M1, K6, M1, slip second marker, K around (46)
Knit around
Knit around
M1, K8, M1, slip second marker, K around (48)
Knit around
Knit around
M1, K10, M1, slip second marker, K around (50)
Knit around
Knit around
P2 (K2, P2) 3 times, slip marker, K around
- Repeat row 16, four times.
Bind off 14 stitches, drop second marker, K around
Cast on two stitches using Knit On method, continue working in the round by joining to the next stitches, K around.
Starting at the marker indicating beginning of round, start K2, P2 ribbing and continue for 6 rows.
Bind off in pattern
Duplicate stitch skull onto back of mitts. Make sure to try on the mitts and find the center for the design. Trust me. Just laying the mitt flat and putting it on will give you a way off center design. Also feel free to graph out whatever design you want and put it on the back.


Graph for duplicate stitch.

Copyright © Nadine Borovicka 2008 All Rights Reserved. No part of this document may be reproduced or distributed without written consent from the author.

Thursday, May 8, 2008

DNA Model - crochet w/ link to knit

DNA Model- a crochet pattern based on the knitting pattern by Kimberly Chapman at http://kimberlychapman.com/crafts/knit-patterns-dna.html I did have permission of the original designer to design this based on her wonderful work. I am very excited she allowed me to do it, because at the time I couldn't knit, let alone even think of working with DPN's. This is for all those crochetiers out there who are scared to death of DPN's or just prefer to use a hook.

Download the PDF here.


Crochet hook, size F
Worsted weight yarn (I did mine in two colors, but to be accurate, the strands should be one color and you should have 4 colors for the connectors where the colors are paired up and don’t change. Ex. Blue always with yellow and red with green)
Tapestry needle
Stuffing


Abbreviations:
Sc – single crochet
Ch – chain
Inc – increase
Dec – decrease


For the main strands tart with the magic ring cast on. 9 sc, join. Do not sc in joining ch. Ch 1, 2 sc in each sc around (18 sc), join. *ch1, inc, sc 7, dec, sc 8, join. Repeat from * until desired length. Stuff tube firmly as you go along. To end, ch 1, sc around, join. Ch 1, dec around (9 stitches). Finish stuffing and gather end closed. Weave in end. Make two.


Make connectors by chaining 12, leaving a long tail at the beginning to use when attaching. Join. Sc in back of ch around. [ch 1, sc around, join.] Repeat [] for 5 more rows. Change color. Repeat [] for 6 rows. Fasten off leaving another long tail for attaching. Stuff firmly and sew onto long, curved tubes.


If you want to make a strand with a left hand twist, in the main strand repeat section, reverse the inc and dec so it reads “ch1, dec, sc 7, inc, sc 8, join.”


Copyright © Nadine Borovicka 2008 All Rights Reserved. No part of this document may be reproduced or distributed without written consent from the author.

Imaginary Hat - loom knit


Imaginary Hat – inspired by Foster’s Home for Imaginary Friends

Download PDF here.

Lion Brand Wool-Ease Thick and Quick in Sky Blue
White and black worsted weight yarn
Green Knifty Knitter
Size G crochet hook
Tapestry needle

Abbreviations:
Ch – chain
Dc – double crochet
Sc – single crochet

E-cast on all pegs of the knifty knitter. E-wrap stitch in round for about 32 rows for adult hat. Bind off with Provisional method. Weave in the ends.

With white yarn and crochet hook:Using the magic ring cast on technique, ch 3. 12 dc in center of circle and join. Ch 2, 2 sc in each stitch around (24 stitches), join. Fasten off leaving a tail to sew with (about 10 inches). Make 2.Using the white circles yarn tail, sew eyes next to each other on the hat using the tapestry needle. Using black yarn and tapestry needle, embroider pupils and a mouth onto the hat. See picture for placement.

For those who might want to convert to regular knitting:
I dug out the hat and measured the gauge. In stockinette I am getting 2 stitches and 3 rows per inch. The hat comes off the loom as a tube (about 9 inches long) and you just gather the top stitches together. On needles you could add shaping to the top to make the gather less noticeable.

Copyright © Nadine Borovicka 2008 All Rights Reserved. No part of this document may be reproduced or distributed without written consent from the author.

FIL Cable Scarf - knit

FIL Cable Scarf- a cabled scarf I designed for my FIL. Unfortunately, I did it in acrylic, so it wouldn't block when it eventually curled itself into a tube. I also did it in a varigated yarn, while lovely, completely hid the pattern. So for all those who are interested in this pattern, keep in mind that I only got about 1.5 feet into the scarf before I frogged it. I'm not sure how it will look done in a solid yarn with some blocking. Maybe someday I'll make it again. But until then, maybe someone else can use it.

Download PDF here.


Size 10 knitting needles
Paton's Shetland Chunky Yarn
Cable needle
Tapestry needle for working in the ends

abreviations:
k - knit
p - purl
Cable Front - slip the next two stitches onto a cable needle and hold to the FRONT of the work, knit the next two stitches, then knit the two stitches on the cable needle.
Cable Back - slip the next two stitches onto a cable needle and hold to the BACK of the work, knit the next two stitches, then knit the two stitches on the cable needle.

Directions:
Cast on 24 stitches.
Knit 4 rows for garter stitch border before beginning pattern rows
row
1. (rs) k4, p4, k8, p4, k4
2. (ws) k8, p8, k8
3. Repeat row 1
4. Repeat row 2
5. k4, p4, Cable Front, Cable Back, p4, k4 (there is a strip of 8 knits in the middle. The first four are a cable and the second 4 are a cable with the top rows coming in towards each other at the center. So you are cableing twice here. Once with the first 4 stitches and once with the second 4 stitches)
6. Repeat row 2
7. Repeat row 1
8. Repeat row 2
9. Repeat row 1
10. Repeat row 2
11. k4, p4, k2, Cable Front, k2, p4, k4 (out of the strip of 8 knit stitches in the middle you are cableing the center 4 stitches while leaving the 2 on each side alone)
12. Repeat row 2

Repeat rows 1-12 until scarf is desired length. Knit 4 rows for garter stitch border before binding off. Bind off loosely. Work in loose ends with a tapestry needle.
Copyright © Nadine Borovicka 2008 All Rights Reserved. No part of this document may be reproduced or distributed without written consent from the author.

Handwarmers - crochet


Crocheted Hand Warmers

Download PDF here.

2 colors worsted weight yarn
Size G crochet hook
Yarn needle
Abbreviations:
Sc – single crochet
Ch – chain
Inc – increase
Dec – decrease
  • Start with main color. Make a slip knot. Chain 33 stitches. Make sure this fits around the largest part of your hand. Add or decrease chains if you need to. You want it snug, but you want to be able to get it over your hand. Join end of chain to first chain stitch.
  • *Ch 1, sc around, join. Repeat from * once. Ch 3, dc around, join. Ch 3, dc around, decreasing three times evenly around, join. Ch 3, dc around, join. Ch 3, dc around, do NOT join. Ch 3, turn, dc around, do NOT join. Ch 1, sc around, join. Ch 3, dc around, join. Fasten off. You worked from bottom of the “glove” to the top.
  • Join color number two with a slip stitch to the bottom row of the glove. Ch 1, sc around (33 stitches, if you started with 33 stitches. If not, make it whatever number your chain started with), join. *Ch 3, dc around, dec 4 times evenly around, join. Repeat from * once. Fasten off. Bottom section should fit close to your arm. Decrease more or less times as necessary to fit correctly.
  • Join color number two to the top row of the glove. *Ch 1, sc around, join. Repeat from * once. Fasten off.
  • You can leave plain or embroider a pattern onto your glove using a strand of yarn and a yarn needle.
Copyright © Nadine Borovicka 2007 All Rights Reserved. No part of this document may be reproduced or distributed without written consent from the author.

Slippers - Loom knit


Download PDF here.

Items Needed:

Blue Knifty Knitter Loom knitting tool

1-2 balls of Bulky weight yarn - I used Patons Chunky Shetland

  1. Working with two strands together (two strands of yarn=to one strand for knitting over), e-cast on all 24 pegs. This project starts at the heel. E-wrap/twisted knit/single stitch (they are all the same stitch, different names) for 8 rows.
  2. Bind off stitches 13 through 24. Take the loop from peg 24 and place it onto peg 1 and knit off. This creates the opening for your foot.
  3. E-wrap on all 24 pegs again (for the first row, you are just creating loops around the pegs you have bound off; you will work them on the second row). E-wrap stitch for 4 rows.
    Bind off stitches 13 through 24. Take the loop from peg 24 and place it onto peg 1 and knit off (I know it sounds like I just repeated myself.) This makes the strap.
  4. E-wrap back and forth, increasing the row at each end. Repeat two more times (6 total rows)
  5. E-wrap on all 24 pegs again and knit off pegs with two loops. E-wrap stitch for 15 rows or until project reaches desired size.
  6. Cast off with gathering method. This makes the toe.
  7. Gather the other end of the project, this makes the heel.
  8. The openings end up with really loose edges so I do a round or two of single crochet to tighten it up.
  9. The slippers end up about a size 9 or 10 woman’s. To make smaller, use a smaller gauge loom. To make larger, after binding off the first or second time, E-wrap stitch a couple of rows before casting on all the loops again. Can also add rows at the beginning and end.
  10. Then make a matching slipper.


Copyright © Nadine Borovicka 2007 All Rights Reserved. No part of this document may be reproduced or distributed without written consent from the author.

Pink Ribbon Pin Pattern- Crochet

Crocheted Pink Ribbon Pin

Download PDF Here.

Need: Worsted weight yarn in any color- you can do this for any awareness ribbon
Size G Crochet Hook
Scissors
Little bit of glue


Make a slipknot, chain 15 stitches


Insert Crochet hook through the Fifth chain from the beginning of the chain.

back view


front view


Yarn over and pull loop through.


Yarn over again


Pull through loop on hook to make 16th chain. Chain stitch 4 more chains.


Fasten off. Dot each end knot with a little bit of glue (superglue works, but gets hard) to keep knot secure. Attach with a safety pin to anything you want to show awareness.


Copyright © Nadine Borovicka 2007 All Rights Reserved. No part of this document may be reproduced or distributed without written consent from the author.