Fleecy Felted Slippers
Loom Knit Pattern byNadine Borovicka
http://nadinescrafts.blogspot.com/
http://nadinespatterns.blogspot.com/
Download PDF Here
Loom Knit Pattern byNadine Borovicka
http://nadinescrafts.blogspot.com/
http://nadinespatterns.blogspot.com/
Download PDF Here
Originally published in Loom Knitter's Circle Magazine Spring 2009 issue available for download here.
During the summer, I like my projects to be small, easy and portable. Who wants to be draping an afghan or sweater across their laps while it is hot out? Not to mention how hard it is to drag those projects to the beach, park or baseball games. But even when the weather warms up, my feet are the first things to get cold. These slippers are small, easy and portable and will keep my feet warm. Plus they have adorable sheep needle felted onto the toes.

Materials
Knitting Loom: Large Gauge Loom with at least 31 pegs. Red Knifty Knitter knitting loom was used in sample.
Yarn: 446 yards of worsted weight wool yarn held double. 2 skeins of Patons Classic Wool in Leaf Green were used in sample.
Notions: Tapestry Needle, Knitting Tool, Felting Needle, Black Felt, White Roving/Wool, Foam Pad
Gauge Before Felting: 10 stitches and 15 rows for a 4 x 4 inch swatch
Length pre felting toe to heel: 14 inches
Length pre-felting heel to top of cuff: 5 inches
Pre-felting foot width: 6 inches
Gauge After Felting: Length post-felting toe to heel: 11 inches
Length post-felting heel to cuff: 3 inches
Post-felting foot width: 5 inches
Abbreviations: CO- Cast on
Pattern Notes: My felting ratio was 1.27 inches unfelted to 1 inch felted. So to figure out how long you need to knit your slipper, multiply the length of your foot (toe to heel) by 1.27 and that will give you the unfelted length you need to knit. Keep in mind that your toe and heel will each make up 2.5 inches of knitting so be sure to begin your heel when you have 2.5 inches left to go.
Ex. My foot is 9 inches long. 9 * 1.27 = 11.43 ~ 11.5. So I would begin my heel once I have knit 9 inches from the point of the toe. 11.5 – 2.5 = 9 This number corresponds to ‘X’ in the pattern

Measure your foot in three places, around the ball of your foot (A), perpendicular to the sole at the start of your ankle (B) and around your ankle (C) according to diagram 1. If any of these measurements are larger than 10 inches, you will need to go up a loom size. The directions will be very similar except you will use a different chart for the toe and heel and will need to use different peg numbers when working on the cuff.
Wrap instructions- Remove the loop that is on the peg being careful not to drop it. Wrap the working yarn around that peg from front to back. Replace the loop you removed. Continue working in pattern.
Instructions:

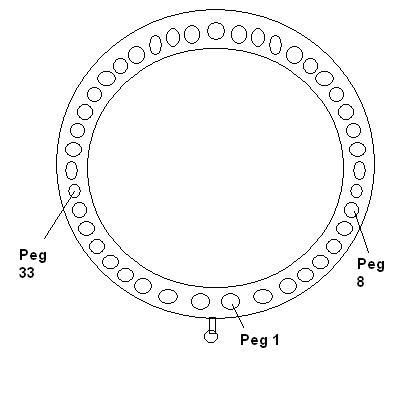
Place markers on Pegs 1 and 16 according to diagram 2. Starting with peg 16, co 16 stitches using e-wrap cast on. Work pegs 1-16 according to these instructions for the toe:
1. e-wrap pegs 1-15, wrap peg 16
2. e-wrap pegs 15-2, wrap peg 1
3. e-wrap pegs 2-14, wrap peg 15
4. e-wrap pegs 14-3, wrap peg 2
5. e-wrap pegs 3-13, wrap peg 14
6. e-wrap pegs 13-4, wrap peg 3
7. e-wrap pegs 4-12, wrap peg 13
8. e-wrap pegs 12-5, wrap peg 4
9. e-wrap pegs 5-11, wrap peg 12
10. e-wrap pegs 11-6, wrap peg 5
11. e-wrap pegs 6-12, on the pegs that have been wrapped, knit 2 over 1
12. e-wrap pegs 12-5
13. e-wrap pegs 5-13
14. e-wrap pegs 13-4
15. e-wrap pegs 4-14
16. e-wrap pegs 14-3
17. e-wrap pegs 3-15
18. e-wrap pegs 15-2
19. e-wrap pegs 2-16
20. e-wrap pegs 16-1
You will now have 16 stitches on pegs, with the cast on edge loose. Reach into the loom and place the cast on edge evenly on the empty pegs on the loom.
Begin to e-wrap around, counter-clockwise, until your work measures X inches from the point of the toe, ending on peg 1. Now repeat rows 1-20 of the toe. This makes your heel.
E-wrap counter-clockwise to peg 23. Turn and work back to peg 24. Work back and forth between these two pegs until the cuff is the length you want. Remember to multiply the felted length you want by 1.27 to get the length you actually need to knit.
Use the double crochet bind off or your preferred stretchy bind off method.
Larger Loom Pattern:
This will make an 11.5-12 inch diameter slipper
Place markers on Pegs 1 and 18. Starting with peg 18, co 18 stitches with e-wrap cast on. Work pegs 1-18 according to these instructions for the toe:
1. e-wrap pegs 1-17, wrap peg 18
2. e-wrap pegs 17-2, wrap peg 1
3. e-wrap pegs 2-16, wrap peg 17
4. e-wrap pegs 16-3, wrap peg 2
5. e-wrap pegs 3-15, wrap peg 16
6. e-wrap pegs 15-4, wrap peg 3
7. e-wrap pegs 4-14, wrap peg 15
8. e-wrap pegs 14-5, wrap peg 4
9. e-wrap pegs 5-13, wrap peg 14
10. e-wrap pegs 13-6, wrap peg 5
11. e-wrap pegs 6-12, wrap peg 13
12. e-wrap pegs 12-7, wrap peg 6
13. e-wrap pegs 7-13, on the pegs that have been wrapped, knit 2 over 1
14. e-wrap pegs 13-6
15. e-wrap pegs 6-14
16. e-wrap pegs 14-5
17. e-wrap pegs 5-15
18. e-wrap pegs 15-4
19. e-wrap pegs 4-16
20. e-wrap pegs 16-3
21. e-wrap pegs 3-17
22. e-wrap pegs 17-2
23. e-wrap pegs 2-18
24. e-wrap pegs 18-1
You will now have 18 stitches on pegs, with the cast on edge loose. Reach into the loom and place the cast on edge evenly on the empty pegs on the loom.
Begin to e-wrap around, counter-clockwise, until your work measures X inches from the point of the toe, ending on peg 1. Now repeat rows 1-24 of the toe. This makes your heel.
E-wrap counter-clockwise to peg 27 Turn and work back to peg 28 Work back and forth between these two pegs until the cuff is the length you want. Remember to multiply the felted length you want by 1.27 to get the length you actually need to knit.
Use the double crochet bind off or your preferred stretchy bind off method.
To felt the slippers:
http://www.knitty.com/ISSUEwinter03/FEATfelthis.html You will probably want to base your felting on measurements instead of feel of fabric. Make sure your slipper does not become shorter than the length of your foot. Also measure around the widest part of your foot (usually the arch) and divide that number in half. Make sure that the width of the slipper does not go below that number. There is some stretch in felting, but not a lot.
To needle felt on the slippers:
For good basic instructions visit: http://sewingneedlework.suite101.com/article.cfm/how_to_needle_felt
For more advanced and 3-D techniques visit: http://www.livingfelt.com/freefeltingpatterns/NeedleFeltingSurfaceDesign.html
To needle felt, you will need black felt and white wool. I use the craft sheets of felt you can get from just about any craft store. First cut out the face, ears and hoof shapes according to diagram 3 (make sure they are small enough to fit onto the slippers).

Since we are working with a background that is an odd shape, I like using a foam mat on the inside of the slipper. A two-inch thick piece of furniture padding cut to fit into the toe of the slipper is perfect. Using the basic directions, needle felt the hooves, face and ears on according to the picture.

Now with the white wool, make cotton ball size poofs. They don’t need to be dense, just very fluffy and light. Now felt several of these on.

Leave these pieces more soft and lofty, i.e. you don’t have to needle these as much. Add enough of these to make a fluffy, fleecy sheep.

To make the slippers non-skid: I am a klutz, I admit it. The way I avoid serious injury to myself when wearing slippers on a tile floor is to use fabric paint to add designs to the bottom. You can write messages, draw designs, designate right and left. This blog has an awesome idea if you want more full coverage: http://www.nicolehindes.com/2007/09/18/making-slippers-non-slip/
Copyright © Nadine Borovicka 2009 All Rights Reserved. No part of this document may be reproduced or distributed without written consent from the author.